In this step we are going to create and launch the Chef server.
if you missed the previous step please check Part 1 and Part 2
Dealing with Chef automation requires some prerequisites beforehand.
Head in AWS and go to OpsWorks page. Change the region if you need to.
Click “Create Chef Automate server” and follow the on-screen instructions. It is important to get a keypair since Chef Automate server is an EC2 instance and we need a way to ssh to the Instance because some of the work will be done there.
While the Chef server is starting up you can download the Credentials and Starter kit.
Credentials are used to authenticate the root(you) user to the chef server web UI (Monitoring dashboard).
How Chef works
Working with Chef has three sides.
- Chef server
- Chef client (node)
- Chef workstation
The server is what keeps all configurations in form of Cookbooks (folders) and Recipes (configuration files written in Ruby). Depending on Node configuration, when a node connects to the server, it downloads and executes the recipes that are made for it. For example if you have a web server and it has Chef Client installed and connected to the server, the client will get all the recipes that are made for web servers and execute them so that this web server you have is configured like all other web servers you have. Chef server takes care of that and it is automated. The work getting it there is not. Some configuration must be made, some recipes must be written or downloaded. All this is done from the third end – the Workstation. This may be your daily workstation. You can write or edit a recipe and upload it to the Chef server, depending on the roles it is for, all nodes with that role will get the update automatically.
How to get Chef working
First of all we must create the server (we already did). Download Credentials and Starter Kit.
Credentials is for accessing the Server UI and starter Kit is for authenticating a Workstation to the Chef server.
After that we need to set up the user_data to install Chef Client and connect every new instance to the Chef server.
Let’s do it step by step.
Connect the Chef Server to a git account.
This is where the recipes are being uploaded. Chef server gets them from the git account and sends them to the relevant nodes.
Now go to OpsWorks in AWS account and click on the already created server. There is a link for Chef Automate Dashboard. Click it and login with the credentials you downloaded.
Note: it may not work with Google Chrome/Chromium. Firefox was ok at the time this document was written.
Dashboard is pretty straight forward. For now there should be no activity what so ever. We first need to add the repository for the cookbooks. For that we must first create one. You need to install Git and Chef Development Kiton your workstation PC. Go to your account and create a repository (“chef-repo” for example) and clone it on your Workstation.
Go to the server dashboard and click on Admin, then SAML Setup and point it to the repo you have created. This is where Chef server will look for the cookbooks. If using GitHub consult on the web how to get a Service Account Service Token so that Chef server can authenticate to the repository and get the cookbooks it needs or delete the ones that it does not need.
Creating an Organization and a User.
We have to assign the user to the Organization. The User is the user in front of the workstation. May be you or other people in your team. Chef server can maintain many organizations and many users per organization. Since now we have only created the server and the workstation but they are not connected. We need an organization and a user to do that. Every created user will get a personal key that will authenticate the workstation to the server.
Let us ssh to the server:
Go to AWS/EC2 tab and be sure it’s the same region you have created the OpsWorks Chef server in.
In the EC2 tab, in Instances there must be an instance (on which the Chef server is installed to) and get its public DNS (Ipv4) address.
Then from terminal/command prompt:
ssh -i "path-to-key.pem" ec2-user@<IPv4AddressHere>
And walla!
Now we are in the Chef server. All the Organization and User creation and control in general is here.
You can consult the chef documentation for more details since we are focusing on our solution only.
Create a User and generate a key
Command is:
sudo chef-server-ctl user-create <username> <firstName> <LastName> <Email> <password> -f <username>key.pem
Create organization for the user
sudo chef-server-ctl org-create <orgShortName> <orgFullName> -a <usernameToAdd> -f validator.pem
This will create the organization and add the user we made before that to the organization.
We also need to get the organization URL:
type
sudo chef-server-ctl org-list -w
This command will print out the urls of the default organization and the one we have made just now.
Copy it somewhere on the PC. We are going to need that shortly.
Type exit so you are back to your PC’s directory.
This USER will be the Workstation USER that will write cookbooks for that ORGANIZATION.
Now we must get the key files to our Workstation. If you do not have scp installed now will be a good time. Most Linux distros have it installed by default.
Scp -i key_file.pem user@your.server.example.com:/path/to/file /home/user/Desktop/
example: stackoverflow.com
In our case this will be:
scp -i path.to.instance.key.pem ec2-user@<IPv4Address>:keyname.pem /destination_on_workstation
You must do that for the both keys – organization and user. Put them somewhere safe. This is access to the Chef Server.
Connect workstation to server
Remember the chef-repo?
Go to the folder where you cloned it and create a folder “.chef”.
In Linux if you create a file or folder with a dot at the beginning of the name this means the folder is invisible. This folder will contain the keys that authenticate the Workstation to the Server so it must not be version controlled (add this folder to .chefignore).
Now you can unzip the starter kit you downloaded and copy the all contents inside the chef-repo EXCEPT the .chef folder. Also copy the knife.rb from the archive to the chef-repo/.chef folder.
Ignore the other files. Go to the directory you downloaded your Organization key and User key and add them next to the knife.rb file.
Now open the knife.rb file and edit the lines to match this:
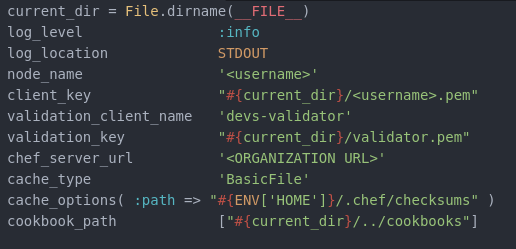
Of Course replace username with the one we have created in the server and the Organization URL we got from there.
Now we need to get the SSL certificates from the server. Go to chef-repo folder and open terminal/command line and execute:
knife ssl fetch
That’s it.
Now you must commit and push all new files from the repo folder. Consult the web for OS specific instructions how to do that.
Now you are connected with the server.
You can try installing Windows cookbooks from the Chef recipe site:
knife cookbook site install windows
If everything is done properly this must install with no problems.
For now in the Chef Automate Server UI there will be no difference or indication that you logged in and installed anything. This is because the organization you have to manage has no nodes.
To fix that we must go back to Terraform and script the Chef-Client installation and authentication so that Node/Client can connect to the server and get its recipes.
You can now continue to the final Part 4.