In part two if this tutorial we are going to focus on using Terraform to create our solution desired structure.
By the end of this part, we will have a up and running VPC with the resources mentioned in the previous part.
If you are not familiar with the project structure please refer to Part 1 of this tutorial.
File structure
NOTE: Instructions are based on Linux operating system
Create an empty folder (repository is prefered). Open terminal (cmd) in the same folder.
Key commands for terraform can be found here. Create 3 files:
- main.tf
- variables.tf
- terraform.tfvars
The terraform apply or terraform plan command will get all .tf files in the root of the terraform folder so it’s not mandatory to have only one main file – different resources may be split into separate files. Same goes for variables.tf. The file terraform.tfvars must contain all the sensitive information (access key, secret key, database passwords, etc.) and should be added into .gitignore for security purposes. variables.tf should contain variable declaration. Variables will be used in other .tf files. Main.tf should contain all resource declaration and configuration (AWS resources).
First steps
Assuming that all actions from step 2 are completed, terraform folder must contain 3 files.
First step is to declare PROVIDER. Open main.tf and add the following block:
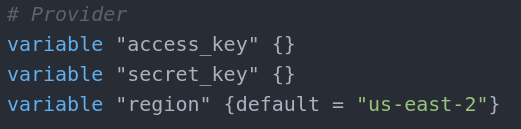
Since Terraform is multi-platform and multi-cloud tool we need to assign it to AWS. The provider block is the resource that connects Terraform with AWS. Access_key and secret_key are the keys obtained from the AWS account and will be used for authentication. Region variable is the AWS region the structure will be deployed to. As access key and secret key are sensitive information, they must be assigned in terraform.tfvars file.

Since Region is not sensitive information it may be assigned in variables.tf file. But as we see in the blocks above, all three variables are assigned from var. so even if a variable is sensitive it must be
placed as declaration in variables.tf
There are two ways of assigning a value to a variable:
- Empty brackets {}
- default keyword in brackets {}
When brackets are left empty, if value is not assigned in terraform.tfvars user will be asked to input the values when terraform apply or terraform plan command is executed. In our case the access_key and secret_keyare assigned in the .tfvars so we will not have to do this.
The default statement is the actual assignment. If the variable is not explicitly used in the main.tf file or it is used as “${var.access_key}”, variable will be used with default value.
With being done with the provider block we are now connected with AWS and we can start creating our structure.
Project Structure
When using a resource in Terraform, some simple rules must be followed.
Declaring is done by the keyword resource followed by “AWS resource type” and a custom resource name “<someName>”. The resource type will reference the actual AWS resource and the resource name will be used in main.tf for referencing the resource locally as a variable.
Resource types and individual resource settings available can be found in Terraform page.
Most settings have a default value so if not even declared in .tf file will get that default value.
VPC
First, we need a VPC to put all other resources into. VPC block is relatively simple
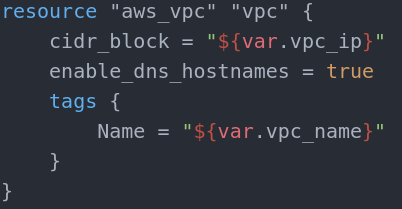
As explained above we follow the pattern resource “type” “name”. The name in this case is plain and simple “vpc”.
The settings below are in the resource body(placed between curly braces).
In this case the only mandatory setting is the Name variable. This is the name that will be used and visible in the AWS dashboard in the VPC section. The cidr_block variable is the IP address range for the VPC internal network. The enable_dns_hostnames is allowing us to assign DNS hostnames to instances inside the VPC (default value is false). If we now move to the variables.tf we can assign the VPC name and IP address range to the same variable names we used in the VPC block(vpc_ip and vpc_name).

Here we set the same variable name as referenced above with a value. If you want to set this at runtime leave the curly braces empty.
Now let’s set the VPC name:
![]()
And we are done. You can test the configuration so far for syntax errors with terraform plan. If it goes well you can apply it with terraform apply and if you are not done with it you can destroy it after applying with terraform destroy.
Internet Gateway
Internet gateway is the way in the VPC.
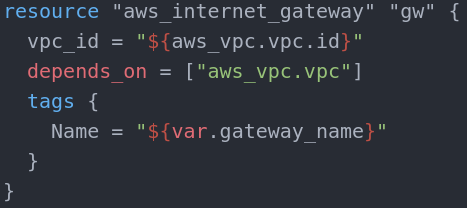
The only mandatory variable here is the vpc_id which point to what VPC should the gateway be set to.
Here we see referencing to a resource as a variable. “${type.name.id}”synthax is pointing to the ID of the object of type aws_vpc with name vpc. We already have that resource declared above so we just assign the gateway to it. Depends_on is quite important parameter. Its terraform specific (not AWS parameter) and it works as synchroniser for resource creation. Terraform works asynchronous which means that first resource creation is executed and terraform moves to the second without waiting for the first one to be done. In our case that can cause the internet gateway to be assigned to a non-existing(not yet done) VPC. To avoid that you can add the depends_on block to create a chain of execution.
Depends_on accepts a list of locally declared resources separated by commas. In our case it’s only the VPC (Note that it is the resource itself, not the ID or name tag). With this being done, internet gateway creation will wait for VPC resource creation.
Name tag variable is not mandatory but it’s a good practice. Name itself is by your choice.
Route table
Every gateway must have a routing table. If you don’t create one, AWS will create a default one.
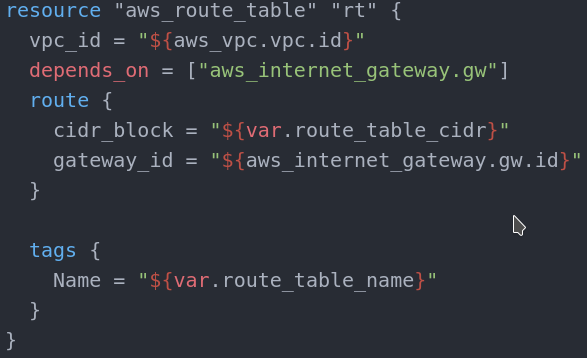
Our route table depends on the Internet gateway we have created above. The only mandatory parameter is the vpc_id. The route block is a routing rule and its optional. In general it forwards the IP from given IP range (cidr_block) and forwards it to another(or the same) route table.
Subnets
The next logical steps will be to assign Elastic load balancer as in the image at the beginning this is the next in line element but the Balancer requires subnet reference as mandatory parameter so we need to do this first.
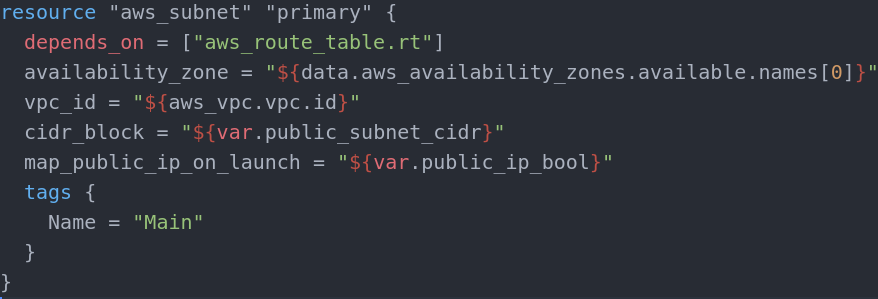
This is the Primary public subnet. It depends on the route table creation (does not really depend on it, I am just using this pattern to create a chain of events so there are no overlaps in creation)
The only mandatory parameters for the subnet are the vpc_id and the cidr_block parameters. In our case we must also assign the availability zone that the subnet must resign in. Also the map_public_ip_on_launch is mandatory in our case. This parameter is the one that makes the subnet public. If we skip this parameter, since its default value is false the network will be private. The subnet must be a part of the VPC network and the ip range in the network must reside in the same network.
In our case the VPC network is in range 172.30.0.0/16 so the subnet will get 172.30.0.0/28 and the second public will get 172.30.0.16/28.
On the other hand, I assigned private subnets with 172.30.112.0/28 and 172.30.224.16/28 but it is a matter of choice as long the subnet is in the VPC network and there are no overlapping addresses.
The tricky part here is the retrieval of availability zones. As shown in the screenshot above, the availability zone is assigned from an array of zones. If we check the variables.tf we can see how this is accomplished:

As pointed out in the comments, this is how we get available availability zones. Using data instead of variable, we get the assigned type from AWS dynamically. In this case list of aws_availability_zones that are availableat the current moment. This line is executed at runtime and it is run only once so there is no possibility to get different results when referring to the list. This way when in main.tf we assign a zone name we get the name of the zone that is available and there is no way if we get the same index somewhere else to get a different result.
If we create the VPC from the AWS console, we will get a default subnet and availability zone. If this is the case we will be able to skip the Availability zone assignment when creating a subnet. If no subnet is set, AWS uses the default one. However, in Terraform making a subnet or availability zone default is not possible for now so we must point to already created subnets explicitly.
Following this step will be sufficient to create 2 public and 2 private networks. Place one public and one private(later referred as Primary subnets) to the primary availability zone. Place the other two (one private one public, later referred to as secondary subnets) in the secondary availability zone. Choosing which zone(index in the availability zone array) is primary is your choice.
After the subnets are up and running and we already have route table, we need to connect them, since subnets only point to Availability Zones, not subnets and we need it to point to public subnets specifically so we need a route table association resource(pretty simple one):
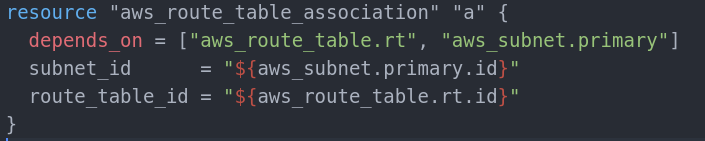
And of course we need to create another one for the secondary public subnet as well. The second one must depend on the secondary subnet.
NAT Gateway
NAT gateway is the resource that provides internet connection for outgoing purposes(internet connectivity for the EC2 instances). NAT Gateway has two mandatory parameters. One is the public subnet it will be in and one is the Elastic IP that must be created beforehand.
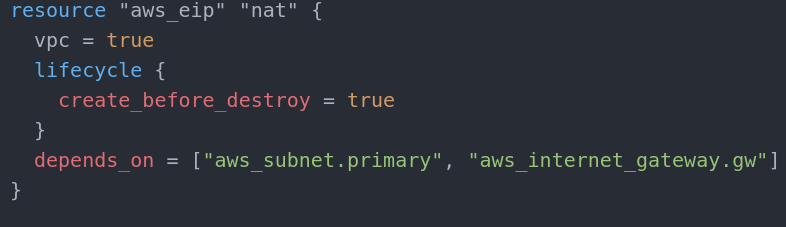
and assign the EIP to the NAT Gateway as allocation_id and pass it the nat object ID. This is why it must depend on the EIP creation. We must assign a public subnet ID also and this is why we depend on that also. I added the internet_gateway dependency just to be sure. Better safe than sorry.
Security groups
Security groups are used to restrict/allow specific ip ranges and/or incoming/outgoing data transfer and access. Basically it is a firewall. Rules must be assigned. If AWS console is used for security group creation, the default rule is to DENY all traffic in and out, no matter the direction and connection type.
Our will look like this:
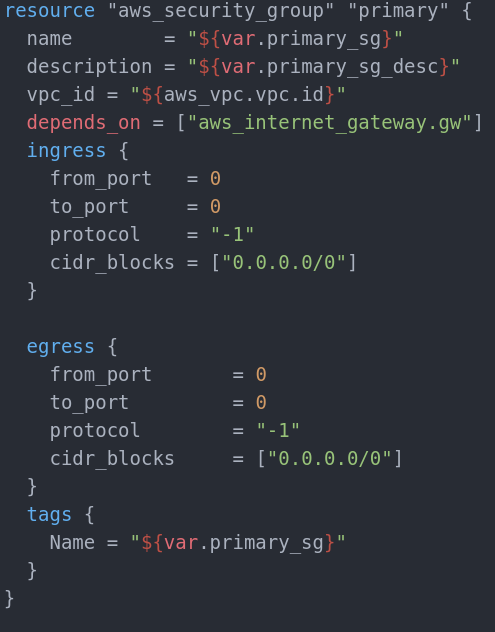
In this case, the Security Group is not required to depend on nothing. I have added dependency just in case(other resources depend on the security group and we must have Gateway for them so, again – better safe than sorry). A rule applies either to inbound traffic (ingress) or outbound traffic (egress). You can grant access to a specific CIDR range, or to another security group in your VPC. Our allows all inbound and outbound traffic for whatever is in the subnet. Name param and tag are up to you, so is the description.
We need to create three separate groups like the one above. One for each private subnet (following the plan scheme at the start) and one that isn’t shown there – Elastic Load Balancer security group. For the sake of example, all three are the same with same (ALLOW ALL) rules and just different names(and descriptions).
Elastic Load Balancer
The load balancer is splitting traffic to all networks(and instances) depending on resource health and availability. Read more at AWS page. Our will look like this:
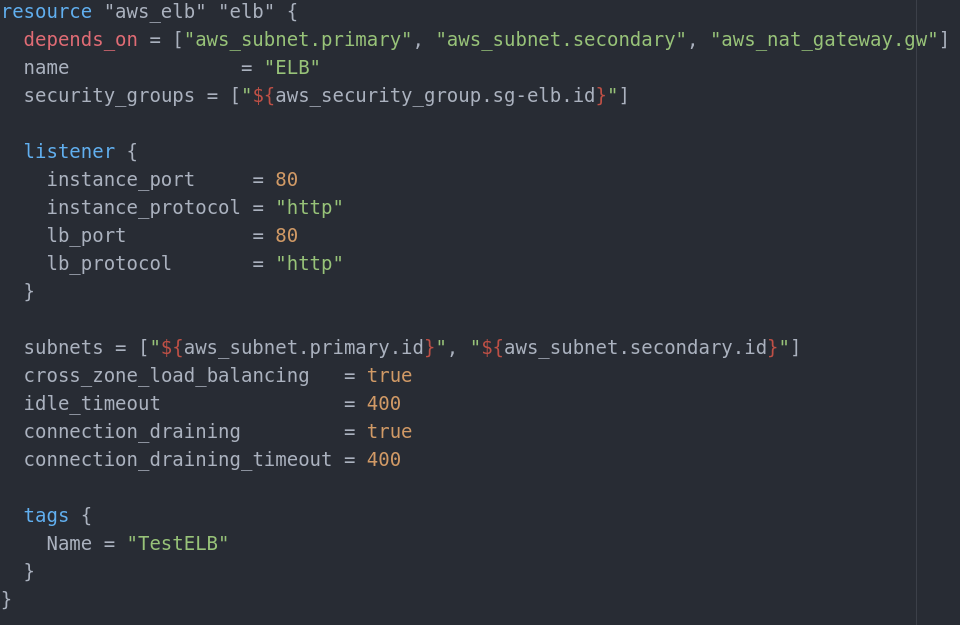
Basically the only mandatory parameters are the subnets and the listener. Rest is up to you.
After all, inbound traffic WILL pass via ELB to reach the subnets so it is smart to have a security group for it (and we already do). ELB can have multiple security groups so it expects a list (as shown in the screenshot) and we are assigning the one we did for the ELB. Note that we are passing a list of ID’s and not the security groups or names. At this point I guess the dependencies are clear. If we use some resources they must be created first.
Listener is what forwards the traffic. When you have a web server for example, when a customer wants to open the page he will be forwarded to port 80. In our case this won’t be the port of the server itself but the ELB. After this the ELB must forward the request to port 80 of the instance(webserver). This of course can be customized as needed. Public Subnets are passed as a list and with subnet ID’s.
For now the instances that we will create will reside in the public networks for the sake of easy configuration but even if we put them in the private ones, the ELB configuration will not change and it will still point to the public subnets and the traffic rerouted to the private subnets afterwards for higher security.
RDS
Subnet_ids is mandatory but actually name is also mandatory since it is the parameter we use when assigning the subnet group to the database instance. Since EC2 instances at the end will be placed in the private subnets we assign the private subnets in the subnet_ids parameter as a list.
Then we can create the database itself:
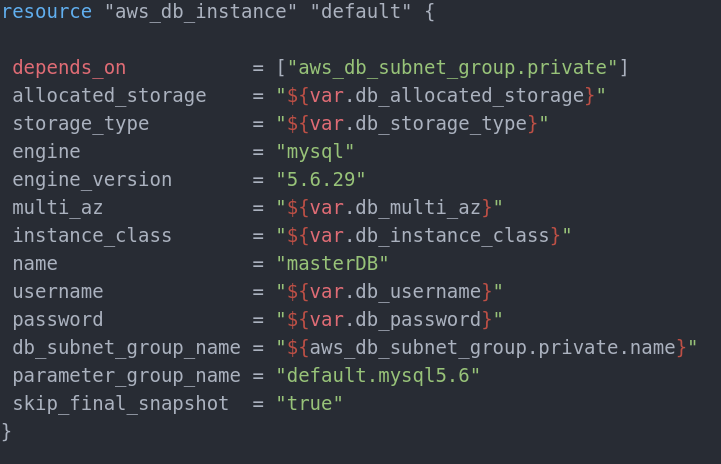
As we need the db_subnet_group we are using it as a dependency. In variables.tf we set the values:

db_username and db_password may be moved to terraform.tfvars like we did with the access and secret key at the beginning as they are sensitive info and we don’t want them version controlled.
multi_az parameter gets a true value because we want it to create the slave database. This will query the db_subnet_group_name to find out where the slave database should be placed as they need to be in different availability zones.
Allocated_storage is the storage (in Gigabytes) that will be available for the database. Please consult AWS database creation page for possible options and information about the storage_type.
instance_class is the type of the database (consult AWS database creation page). In our case it is dynamically required at runtime as the username and password.
Consult AWS database creation page for database engine, parameter_group_name and engine_version possible values.
Skip_final_snapshot is the option to snapshot the database when it is destroyed to prevent data loss. Here it is disabled because for testing purposes if you need to destroy a test run, database won’t destroy and you will have to do this manually from the AWS dashboard since Terraform does not support destroying databases with final snapshot enabled. In a real-world situation it will be a good idea to set this option to true as it prevents entries deletion and saves you from data loss.
EC2 Instances and AutoScaling Groups
In this example we won’t cover simple EC2 instance creation with Terraform(it is covered in the Terraform docs page). Our solution requires a bit different touch.
Since we have a ELB up and running, our load will be split between subnets and therefore between instances. But what happens if an instance fails to comply? OS problem? Network problem?
The solution must be prepared for this. ELB (by default) does a frequent health check of all running instances in the Availability zones and subnets it’s assigned to. But if a problem occurs the only thing that ELB can do is to reroute traffic to the other instance(s).
Here the Autoscaling Group kicks in. ELB and ASG work together in a way. ASG has its own health check but it can use the ELB health check statuses to determine if an instance or a service in that instance is up and running (by pinging the port it listens to – 80 for http for example). If a service/instance failed to respond to the ping two times (by default, adjustable) with an interval of 30 seconds (by default, adjustable) in the given timeout value in seconds, current health status becomes “unhealthy”. Another instance has to be created and the unhealthy one destroyed.
This is what ASG does. ASG needs a launch_configuration to know what instance type is needed.
Our configuration will look like this:
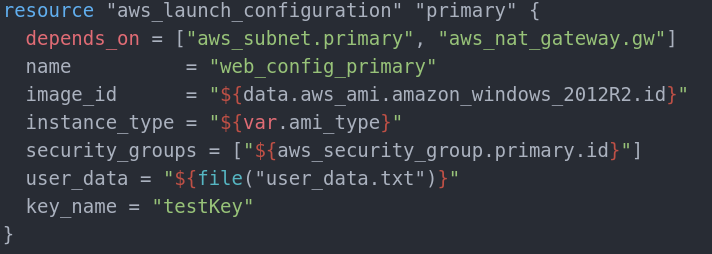
Dependencies are clear. Name is up to you. We need to create two launch configurations, one for each security group. Image_id and instance_type are mandatory. In our case we use t2.micro as instance type as it falls under Free Tier and it will be free(consult AWS for more free tier information). Consult the AWS EC2 Instance creation page for options for instance_type parameter.
Image_id is the OS snapshot that we will use for the EC2 instance. They are updated frequently and Ids change often. This means to get the latest OS snapshot (Windows Server 2012 R2) we must get it dynamically (like the Availability zones). The reason for this is that old images are being pushed out of usage and if ASG uses a given ID and the ID is being deprecated, it will not be available for the instance. Note that using latest image is not a good practice. Some applications may not be fully compatible with the new OS updates. Some may require additional configuration. For the sake of this example will will use the latest. This is how we get it: in variables.tf:
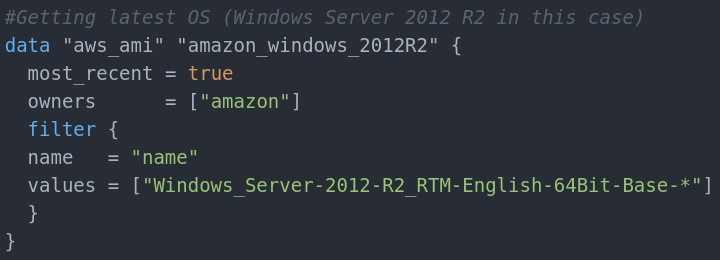
Comments and text above explains what is happening. This data variable is a list with images in it – the latest, most_recent versions of the Windows Server 2012 R2 64Bit in English.
Later on, as we did with the Availability Zones we can get the list and use the [0] element in it as our image_idin the launch configuration. Key_name parameter must be the name of the keyPair that was initially created in the AWS console. This means that every new instance will use one key for remote desktop connection access.
We will cover user_data at the end because it is directly connected to the next chapter: Chef
Finally the Autoscaling group itself looks like this:
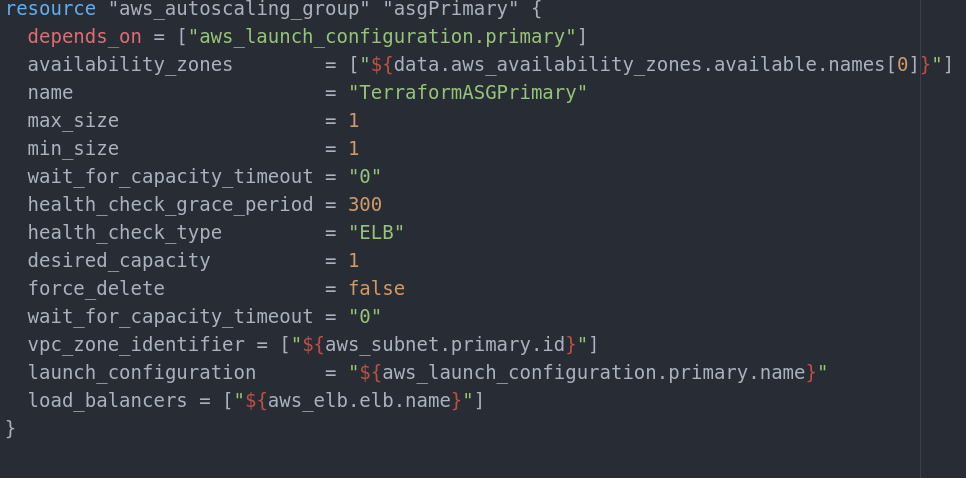
For the end result we need two ASG with a launch_configuration for each ASG. Every private subnet must have one ASG (as shown in the schema at the start of this document).
Every ASG must point to its own launch_configuration and to its own public subnet (the public subnet in the same Availability Zone) and both ASGs must point to the ELB for health check statuses retrieval. Note that launch configurations are used with .name value, not ID`s or the resource itself. Same goes for ELB. The subnet ASG points to (vpc_zone_identifier) is the subnet in which the ASG will create the new instances when needed. If this param is not set, ASG will search for a default subnet and this is not available as an option with Terraform at this point so this will end with exception.
max_size, min_size and desired_capacity are settings that provide minimum, maximum and prefered instances count to be online at any given moment. Health_check_type overrides the default ASG health check and attach it to the ELB’s healthcheck. Force_delete forces instance deletion even if the OS is non-responsive(no matter the problem).
Now if we do terraform apply in the Terraform folder the current configuration should probably launch without any issues.
Since we have no EC2 instances and each ASG has a minimum of one instance, ASG will immediately create an EC2 Instance. The same goes for the secondary ASG as well. So after the terraform script is executed, 2 instances will be provided automatically, using the launch_configuration for each ASG.
At this point our job with Terraform is almost over.
We need to assign the user_data parameter. User_data is some command(s)/script that will be executed when the instance is up for the first time. This is usually done with provisioner resource, but it is only available in EC2 instance resource. In our case we don’t use EC2 Instance resource so this option is not applicable. The other option that is usable with launch_configuration is user_data.
If we check the launch_configuration resource above, we can see that user_data is already assigned.
Let’s check how this works.
File needs to be txt file (.ps1 may also work but this was the option that worked for me)
File needs to have
<script></script>
tags if it will be launched with cmd.
Powershell tags are
<powershell></powershell>
Whatever the file contains, it must be placed between one of those two tags.
You can now continue to Part 3 of this tutorial and find out how to manage Chef Server so we can connect all the resources we created in this step into one self configuring solution.