
In our second part of IAM tutorials you will learn how to delegate access across AWS account using IAM roles. In the end of this part you will know how to switch between accounts without logout.
Prerequisites
Before starting the following steps below you should have :
- two separate AWS accounts – Production (ID number 555555555555) and Development (ID number 777777777777)
- user and group in the Development account
- you don’t need to have any users or groups created in the Production account
Step 1 – Create a Role
You have to use AWS Management Console to establish trust between two accounts. You have two AWS accounts Production (ID number 555555555555) and Development (ID number 777777777777).
To obtain the Development AWS account ID
- Go to the Amazon Web Services website, click on My Account, choose AWS Management Console, and then sign in to the AWS Management Console for the Development account.
- In navigation bar, choose Support, and then Support Center. The Account Number is in the upper right corner immediately below the Support menu. The account ID is a 12-digit integer. For this scenario, you pretend the Development account ID is 777777777777; however, you should use a valid account ID if you are reconstructing the scenario in your test environment.
To create a role
- Sign into the IAM console at https://console.aws.amazon.com/iam/
- In the navigation pane of the console, choose Roles and then choose Create new role
- You should select role type Role for cross-account access

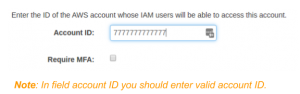
- In this step you should enter your Account ID
- In second screen you should attach a policy (if you have one created) or you can attached it later, choose Next step
- In the next step you should enter the policy name and a short description
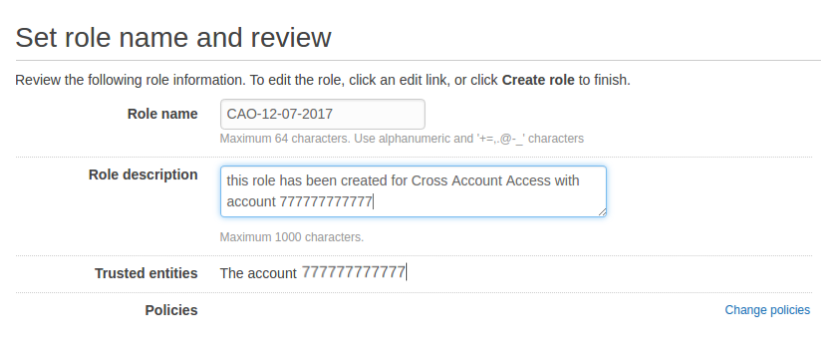
You can check and modify your role. From Tab “Trust relationships” and push button “Edit trust relationship|”. In this view you can modify directly the policy in JSON format:
{

  "Version": "2012-10-17",

  "Statement": [

    {
      "Effect": "Allow",

      "Principal": {

        "AWS": "arn:aws:iam::746890340422:root"

      },
      "Action": "<strong>sts:AssumeRole</strong>"

    }

  ]

}
Modify Permissions to attached policies. In our case we attached one of default policies AmazonEC2ReadOnlyAccess because we want the user to see EC2 instances without creation.
  "Version": "2012-10-17",

  "Statement": [

    {

      "Effect": "Allow",

      "Action": "ec2:Describe*",

      "Resource": "*"

    },

    {

      "Effect": "Allow",

      "Action": "elasticloadbalancing:Describe*",

      "Resource": "*"

    },

    {

      "Effect": "Allow",

      "Action": [

        "cloudwatch:ListMetrics",

        "cloudwatch:GetMetricStatistics",

        "cloudwatch:Describe*"

      ],

      "Resource": "*"

    },

    {

      "Effect": "Allow",

      "Action": "autoscaling:Describe*",

      "Resource": "*"

    }

  ]
Step 3 – Test Access by Switching Roles
After completing steps above , you have a role that grants access to a resource in the Production account.
Switch roles (Console)
Login to your account console 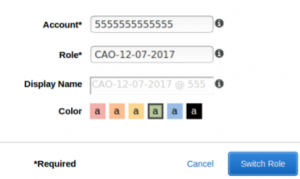 https://777777777777.signin.aws.amazon.com/console using username and password which you already downloaded when you created usertest.
After login you select Switch Role from the menu below the username. After that you will see a new window where you should enter your Account ID and Role. You have an option to change account Color.