
In this article, I’ll go over the most important pricing principles that all AWS users need to know.
I’ll also do an overview of the different pricing models, along with some examples from EC2, S3 and Lambda.
If you’re already spending $100 million a year on AWS (Hi, Lyft), this article might not be for you.
But if you’re just starting out and you’ve managed to spend your entire monthly budget in a day (Hi, everyone using Lambda for the first time), keep reading.
Let’s get started.
AWS Pricing Overview and Principles
If you go to the AWS pricing page, you’ll see that there are 3 ways to pay for the resources you use. I want to quickly run through them and suggest a few common sense principles.
Pay-as-you-go (On-demand)
This is what pops into your head when you think of the cloud. You use resources only when you need them. At the end of the month, you pay for what you’ve used. There’s no buying physical servers and wondering what to do with them in case you overprovisioned.
Save When You Reserve
You can also request specific services in advance. That way, you’re committed to working with AWS and get a price reduction in return. You can pay nothing upfront (most expensive), partially upfront (less expensive), or all upfront (least expensive) for your reservation.
Pay Less by Using More
Some AWS services are tiered based on your usage. For example, the more data you upload to S3, the less you pay per GB. As you scale, you can reduce this price even more.
Check out the video below if you want more details.
Now, this all seems pretty easy to digest. You’d be surprised by how many people skip this part and rack up horrendous bills as a result.
That said, let’s set a few principles you should follow when getting started.
Principles might be a strong word since this is just common sense but bear with me.
On-demand pricing is not cheap. It’s easy to get fooled into thinking the cloud is cheap by design. Price has been the main selling point for all cloud providers. Don’t get fooled. Use on-demand pricing only when you really need to.
The more you commit, the less you should pay. If you want to save money, this is how you do it. Making a commitment is the way to get substantial cost-savings in AWS. If this principle doesn’t hold true for a specific service, you’re probably using it wrong.
Read the find print. More than once. Check the price tag of each service and especially everything written in a smaller font. AWS releases detailed documentation for this purpose. It’s long and boring and you still shouldn’t skip reading it. I know new tech is exciting but take your time and get a good understanding of how pricing works for specific services.
Estimate, test, analyze. Always jot down some estimates before you start using a service. AWS has a bunch of tools for the job like the Simple Monthly Calculator. Also, run a few tests to see what works and what doesn’t. Finally, get in the habit of analyzing your bills. It’s not the most exciting activity you can do, but it can save you both money and headaches in the long run.
A quick sidenote – AWS has released a different Pricing Calculator that will completely replace the Simple Monthly Calculator. I recommend getting familiar with the Pricing Calculator before that happens.
Now, let’s look at AWS’s Pricing Plans before jumping into the examples.
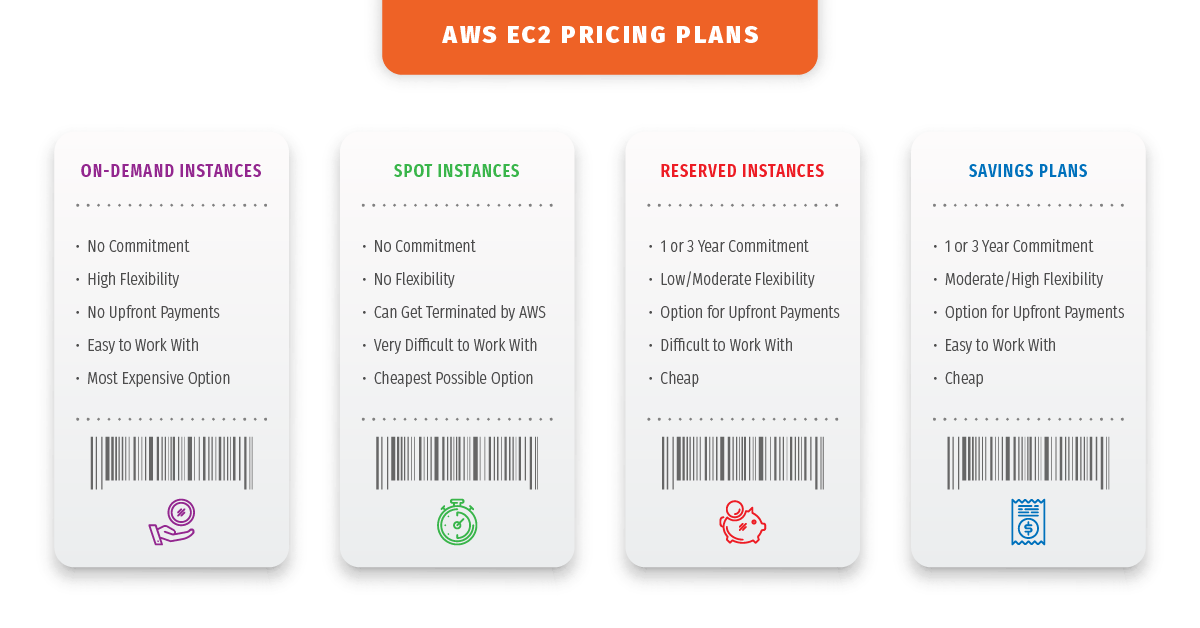
AWS Pricing Plans
I’ll be talking about pricing plans in the context of EC2 since it’s the service that everyone uses. Also, AWS offers the most variety in terms of pricing plans for EC2.
On-demand
We already covered this in the beginning. When you use on-demand pricing, you pay by the hour or by the second without pre-paying for anything. If you’re just testing AWS and don’t want to commit, this is the way to go.
Advantages
- The most flexible pricing option.
- No upfront payments.
- Great for unpredictable workloads.
Disadvantages
- The most expensive pricing option.
- Bills can get out of control quickly.
Spot Instances
A company of AWS’s scale will always have space computing capacity available. That’s where Spot Instances come in. They’re up to 90% cheaper because you’re occupying this spare capacity that’s otherwise just losing money.
Think of Spot Instances as an airline offering huge discounts for their last remaining seats. Only with Spot Instances, you can get bounced out of the airplane (your instance can be terminated) with a 2-minute notice if someone else comes along and pays more than you.
There’s an incredible amount of value in using Spot Instances if you know what you’re doing.
However, if you’re just starting out, I recommend sticking to the most narrow and risk-free use case – workloads that won’t affect your business directly when terminated.
Advantages
- Offer the largest possible costs-savings.
- Perfect for getting spare compute capacity and scaling quickly.
- AWS offers a Hybernate option that saves your instance in the same state and relaunches it when spare capacity becomes available again.
- You get a 2-minute warning before the instance is terminated.
Disadvantages
- Your instance can get terminated at any time.
- Really difficult to use the right way.
As you get more advanced, you’ll discover clever ways to use Spot Instances effectively. For example, SkyScanner use only Spot Instances for their multi-region Kubernetes clusters while serving more than 80 million customers.
Again, if you’re new to AWS, stick to the basics.
Reserved Instances
Reserved Instances (RIs) are a good way to save money by committing to use AWS for the next 1-3 years.
As the name suggests, you reserve instances and you pay for them regardless of your usage. Because you’ve committed to using AWS you get a discount.
There are also different ways you can pay for your reserved instances, which I already went over – No Upfront, Partial Upfront and All Upfront. The more you pay upfront, the larger the discount.
Besides Standard RIs, you can also purchase Convertible RIs. These come with the option to change the instance you’ve reserved to another type.
With Covertible RIs, you’re only committing to a specific region for a given period. You still have to choose an instance family, but you can change it whenever you need to. This, of course, makes them more expensive than standard RIs.
Advantages
- Less difficult to set up and maintain than Spot Instances
- Great cost-savings.
Disadvantages
- Once you rack up a lot of instances, RIs become a pain to manage.
- Choosing the perfect instance family can get confusing. Just check out the Instance Type Page.
- You pay for the reserved capacity regardless of your usage.
- Savings Plans are a better option for most and will probably spell the end for RIs.
There are lots of companies that built their business models on purchasing and managing RIs for their clients. That should tell you RIs are not easy to maintain, especially at scale.
If you’re starting today and you haven’t reserved any instances, Savings Plan are the way to go.
Savings Plans
Savings Plans were announced in 2019 as a new, simpler way to operate on AWS.
With Savings Plans, you commit to a level of compute usage measured in $ per hour for a 1 or 3-year term. The savings discount is applied to all usage up to that level. Everything above that level is on-demand.
The key here is that you aren’t going over a thousand different instance types and wondering which one to choose.
Savings Plans effectively remove most of the effort that goes into managing RIs.
There are 2 types of Savings Plans – EC2 and Compute. They’re quite similar but have 3 main differences you need to know:
- Compute Savings Plans aren’t tied to a region or an instance family while EC2 Savings Plans are.
- Compute Savings Plans support Fargate, meaning you can transition between EC2 and Fargate with your Savings Plan being applied continuously.
- Compute Savings Plans offer a smaller discount because they’re more flexible.
Advantages
- The best possible combination of flexibility, simplicity and price.
Disadvantages
- Still relatively new and you can only use them in a limited number of ways.
- You pay a fixed amount regardless of your usage.
Honestly, I’m struggling to find anything negative to say about Savings Plans. I believe they’re the real deal and will be the primary option for most users.
Dedicated Hosts
Finally, Dedicated Hosts are physical servers that you rent. You get an entire device just for you and AWS takes care of administrative tasks like cleaning and maintaining the hardware.
The other models also give you your own piece of the cloud but on a software level. A Dedicated Host does that on a hardware level.
Advantages
- The most secure and reliable way to run on AWS since no one else can use the hardware you’re using.
Disadvantages
- Super expensive.
I won’t go into details here since, for most users, it never makes sense to rent a dedicated server. This service is mostly for the enterprise sector.
I know this is a lot to take in. Let’s jump into a few examples to make things clearer.
EC2 Pricing
Let’s say we need some compute optimized instances, but we don’t want to break the bank.
The C family contains all the compute-optimized instances.
We choose a Linux c5d instance with 2 vCPUs, 4 GiB of memory and Instance Storage of 1 x 50 NVMe SSD (in GiB). We decide to use 3 of these instances in the EU Ireland region.
The total monthly costs for each pricing model (with a 1-year commitment for RIs and Savings Plans and no upfront payments) would look like this:
As you can see, On-demand is the most expensive option. Standard RIs are the cheapest option because they provide less flexibility. Savings Plans are a bit more costly than RIs because they’re easier to use and more flexible.
Prices might also vary depending on which region you spin up your instance in.
EC2 Free Tier
The EC2 Free Tier includes 750 hours of Linux and Windows t2.micro instances each month for one year.
The t2.micro has 1 vCPU, 6 CPU Credit an hour, 1 GiB of memory and only EBS storage. Not amazing capabilities but still enough to get your feet wet.
S3 Pricing
Amazon Simple Storage Service (S3) is AWS’s storage platform. You can upload files, create access points/policies for who can access those files and a ton of other things.
You’re charged based on a few factors: used storage space, number of requests, the volume of scanned/returned data, monitoring and automation fee (with the Intelligent Class) and data transfer.
S3 has 6 storage classes – Standard, Intelligent Tiering, Standard-IA (Infrequent Access), One Zone-IA, Glacier and Glacier Deep Archive. I’ll get into the specifics of each in a separate article.
The Standard-IA and One Zone-IA are almost identical. The difference is that with One Zone your data is stored in a single Availability Zone (AZ), meaning if the AZ is destroyed, your data is gone.
Glacier and Glacier Deep Archive have specific use cases – cheap storage that’s usually used for infrequently accessed data, long-term archiving, or DR.
Here, we’ll only look at examples from the most popular classes – Standard and Intelligent Tiering.
Say we’ve stored 1 TB of data in the EU Ireland region. Since we’ve chosen Standard Storage, we’ve performed operations with the data frequently.
To go above the Free Tier, we’ve made 30 000 PUT/COPY/POST/LIST requests and 20 000 GET/SELECT and other requests. S3 scanned 500 GB of data and returned 200 GB.
Our monthly bill would look something like this:
Now, let’s assume we don’t know how frequently we’ll need to access our data.
The Intelligent Tiering Class can help us by storing objects in two tiers – one for frequently accessed data and another for rarely accessed data. It does that by monitoring and moving data that hasn’t been accessed in 30 days to the infrequently used tier. If you use that data, S3 automatically moves it to the frequently accessed tier.
Again, we’re working in the EU Ireland Region.
In this case, we decide to store 10TB of data, 30% of which isn’t accessed during the month. The Intelligent Tier helped us by monitoring 50 000 objects and moving between the frequently and infrequently accessed tier. We made 250 000 PUT/COPY/POST/LIST requests and 30 000 GET/SELECT and other requests. Data scanned was at 6 000 GB and data returned – 2000 GB.
Finally, we made 10000 requests to move objects to intelligent storing.
Now, S3 pricing can get a lot more complex than this.
Where most users get burned is the data transfer prices. I recommend learning them in detail before increasing your reliance on S3.
S3 Free Tier
The Free Tier for S3 includes:
- 5 GB of Storage in the Standard Class
- 20 000 GET Requests
- 2,000 PUT, COPY, POST, or LIST Requests
- 15GB of Data Transfer Out each month for one year
AWS Lambda Pricing
Lambda is among the most popular AWS services right now.
You can use functions to encapsulate your code and tell Lambda when it should run. No instance (server) provisioning or maintenance. Just tell AWS when (during which events) your code should run and voila.
Of course, flexibility comes at a price and Lambda bills can get outrageous if you’re not careful.
With Lambda, you get billed based on the number of requests you make each month, the duration (in ms) from when your code started executing until it returned or terminated, and the memory you allocated to the function.
1 000 000 requests cost $0.20 and every GB/s costs $0.000016667.
You also have data transfer costs and other ways to spend more than you should.
In the most basic scenario, your bill would be calculated like this:
Request Charges + Compute Charges (in GB/s) = Total Cost
Let’s look at an example.
We made 50 000 000 requests to our function. The duration of each request was 350ms and we allocated 512 MB of memory to our function.
First, AWS starts by rounding up our 350ms to the nearest 100ms. No, not 300ms. It gets rounded to 400ms because AWS, that’s why.
Second, we calculate the total number of billable GB/s:
- 50 000 000 requests x 400 ms x 0.001 (to convert the ms to s) = 20 000 000 compute seconds
- 5 GB (our 512 MB of memory) x 20 000 000s = 10 000 000 GB/s
- The total number of billable GB/s is 9 600 000 because AWS includes 400 000 GB/s in its Free Tier.
- So, our monthly compute costs are 9 600 000 GB/s x $0.000016667 = $160.
Next, we need to determine our billable requests.
- In this case, that would be 49 000 000 because AWS includes 1 000 000 requests in its Free Tier.
- So, 49 000 000 requests x $0000002 = $9.80 in billable requests. We multiply by $0.0000002 because we’re billed per 1 million requests.
Finally $9.80 in billable requests + $160 in monthly compute costs = $169.80 total monthly costs.
Like with S3, most people get burned with data transfer and other similar charges. For example, your Lambda will need to talk to other AWS services like the API Gateway or S3. This will incur additional charges.
Before you start spinning up functions, get familiar with the AWS Lambda pricing page and especially the Data Transfer and Additional Charges part.
Lambda Free Tier
As you already guessed by now, AWS includes 1 000 000 requests and 400 000 GB/s in its Free Tier for Lambda.
That’s more than enough to get started. Again, always be mindful of which other services Lambda talks to. Those can get you in a lot of trouble even if you’re just using the Free Tier for Lambda.
Conclusion
This turned out to be way longer than expected. I guess AWS pricing really isn’t that simple.
I hope you got something useful out of all that. Let me summarize some key points that might get lost in all the information:
- Always read pricing documentation. Especially the fine print, i.e., data transfer and similar charges. And yes – I know how boring it is.
- Don’t lose track of the dependencies and communication between services.
- If you’re experimenting with the Free Tier, don’t leave stuff on overnight unless you really need to.
- Monitor your spend constantly and analyze it at least once a month.
Finally, AWS Cost Explorer, the Simple Monthly Calculator and the Pricing Calculator are there for a reason. Use them.