This is a brief introduction to OAuth 2.0 / OpenID Connect protocol. Before we dive into OAuth 2.0 and OpenID Connect, lets talk about two terms that are tightly related to OAuth and they worth being mentioned.
Authentication & Authorization
Authentication and Authorization are two terms that are widely used. Very often they are used together and sometimes it is possible to confuse one with the other, but Authentication and Authorization are actually two different things.
Authentication – verifies who the user is i.e. validates the identity of the user. It usually requires the user to provide valid credentials to an application and then the application verifies that the user is the one that he claims to be. Once a user is authenticated an authorization process can take place.
Authorization – verifies what an authenticated user can do. In general, authorization determines whether user have the privilege to access a certain resource.
OAuth 2.0
OAuth 2.0 is an open standard for authorization. It provides secure access for an application to a resource on behalf of the resource owner. OAuth 2.0 can be used with web, desktop and mobile applications.
OAuth 2.0 is designed to work with HTTP and allows access tokens to be issued easily and securely. The access tokens enables application to gain limited access to specific resources, based on the scope for which the access token is issued. Access token have certain lifetime and after that they expire and the resources for which the tokens are generated cannot be accessed using that token. Usually an access token is valid for an hour.
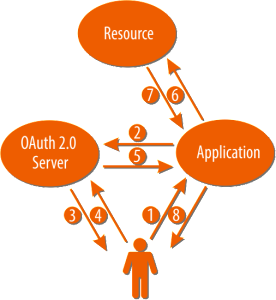
The overall flow of using the OAuth 2.0 is as follows:
1. User tries to access a resource through the Application
2. Application makes a HTTP request to the OAuth server with the following parameters:
– client_id
– scope
– redirect_uri
– response_type
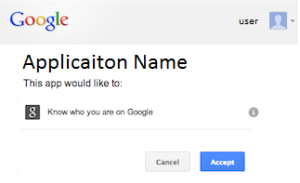
3. OAuth Server asks permission by the User
4. User grants access to the resource
5. OAuth Server issues an access token to the Application
6. Application uses the token to access a resource in the allowed by the scope, by passing the access token in HTTP header
7. Application receives the requested resource
8. User receives the requested resource in the Application.
Some of the important parameters used in the OAuth 2.0 requests are:
client_id – This is the id of the application in the OAuth Server. The OAuth Server uses this to identify which application is making an authorization request. This is the username of the application.
client_secret – If the client_id is the username, the client_secret is the password for the application. It is used to authenticate the application against the server.
response_type – This parameter determines what the response of the OAuth server will be. It is used when making a call to the Authorization Endpoint of the OAuth Sever. Responses can be:
token – Access token is directly returned by the server. This is used in Implicit Flow
code – Authorization code is returned by the server. This is used in the Code Flow
grant_type – Grant type is used to get an access token when making a call the Token Endpoint. There are several grant type available. Here are a couple of them:
authorization_code – This grant type is used when exchanging an authorization code for access token.
refresh_token – When using Code Flow, a refresh token is also issued and this grant type is used to get a new access token by using a refresh token.
scope – This parameter determines for which resources the access token will be valid. An example for scope is “openid”, which is used when using the UserInfo API in OpenID Connect.
redirect_uri – This parameter is the url to which the OAuth Server will redirect the request after the processing a request. This is where the access token is passes with the Client Flow and the authorization code with the Server Flow. Also if an error occurs, information for the error will be also passed through the redirect_uri.
The OAuth Servers exposе two primary points for issuing an access tokens:
1. Authorization Endpoint – used to initiate an authorization request. For example, Google’s Authorization Endpoint is https://accounts.google.com/o/oauth2/auth. When making a request to this endpoint, based on the response_type an access token (when using Implicit Flow) or authorization code (when using Code Flow) is returned in the redirect_uri.
2. Token Endpoint – used with several flows to get an access token. For example, Google’s Token Endpoint is https://googleapis.com/oauth20/v3/token. With the Code Flow for example, the authorization code is passed as query parameter in the request to the token endpoint to get an access and refresh tokens.
Two of the main flows for accessing resources on behalf of the resource owner used in the OAuth 2.0 are the Implicit and the Code flows. The following two sections describe both flows in more details.
Implicit (Client Side) Flow
The Implicit flow is used mainly with client side applications. For example a JavaScript application running in the client’s browser. This flow is simple and allows easily to gain an access token. The client side flow uses only the Authorization Endpoint and after successful authorization, the access token is returned as a # hash fragment in the redirect_uri.
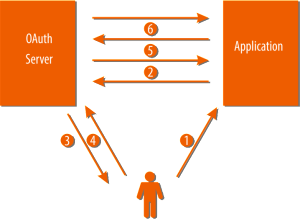
Here is how the Implicit Flow looks like when using the UserInfo endpoint for OpenID Connect authentication:
1. User wants to sign into the Application
2. Application makes a HTTP request to the OAuth server with the following parameters:
– client_id
– scope
– redirect_uri
– response_type – this should be token
Here is an example of constructing the url and requesting authorization in JavaScript:
var authServer = "<OAuth 2.0 Authorization Endpoint>";

var client_id = "<Client Id>";

var scope = "openid";

var redirect_uri = "https://localhost:44300/oauth2Callback.html";


var url = authServer

     + "?client_id=" + client_id

     + "&redirect_uri=" + redirect_uri

     + "&scope=openid"

     + "&response_type=token";


var w = window.open(url, "oauth", "width=900,height=900");
4. User grants access to the resource
5. OAuth Server issues an access token to the Application and redirects the Application to the redirect_uri with the access token as a # hash fragment of the redirect_uri. Here is how the redirect URL looks like after OAuth server redirects with assess token: https://localhost:44300/oauth2Callback.html#access_token=062afc38bf75e1b44bd842c2309ba6&expires_in=3600
6. Application gets the access token from the redirect_uri makes a call to the UserInfo Endpoint to get information about the user. Here is a simple JavaScript call for that:
var xmlHttp = null;

xmlHttp = new XMLHttpRequest();

xmlHttp.open("GET", "<UserInfo Endpoint>", false);

xmlHttp.setRequestHeader("Authorization", "Bearer " + token);

xmlHttp.send(null);
Code (Server Side) Flow
Code or Server side Flow is a little more complex than the Implicit Flow, but it provides two main advantages.
Firstly, except the access token, one more token is issued by the OAuth Server, which is the Refresh Token. The refresh token provides the ability to request new access token by just making a request to the Token Endpoint, which is transparent to the user and provides better user experience. The refresh tokens can also be used on the server, when the user is not.
The refresh token does not have an expiration date, so it can be stored in a database for example. Even if the user changes its password, the refresh token will still be valid. The refresh token stops being active only if the user manually revoke access for the application which has requested the refresh token. This usually happens by user login to the OAuth Server and there should be a page that lists all the application with refresh tokens.
The second advantage is that they provide better security, since the token is never passed through the url. Instead, to get an access and refresh token server to server POST request should be made, which requires the client secret in addition to the client id.
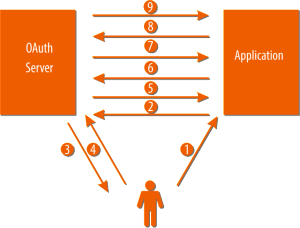
The flow here is similar to the Implicit Flow, but it requires few more steps to complete. Here it is, again for accessing UserInfo endpoint for OpenID Connect authentication:
1. User wants to sign into the Application
2. Application makes a HTTP request to the Authorization Endpoint with the following parameters:
– client_id
– scope
– redirect_uri
– response_type – this should be set to code
3. OAuth Server asks permission by the User.
4. User grants access to the resource
5. OAuth Server issues an authorization code to the Application and redirects the Application to the redirect_uri with the authorization code as a query parameter of the redirect_uri. Here is how the redirect url looks like after OAuth server redirects with authorization code: https://localhost:44300/oauth2Callback.html?code=ASDF1234
6. Application uses the authorization code and makes a POST request to the Token Endpoint with the following parameters:
– client_id
– client_secret
– redirect_uri
– grant_type – it should be set to authorization_code
– scope
– code – the authorization code received by the Authorization Endpoint
7. OAuth Server sends to the Application response in JSON format which contains:
– access_token
– refresh_token
– expires_in – when the access token will expire
– id_token – this is received when the scope is openid (see OpenID Connect for more details on the id token)
8. Application gets the access token from the redirect_uri makes a call to the UserInfo Endpoint to get information about the user.
9. Application receives the information as JSON
OpenID Connect
OpenID Connect (or OAuth 2.0 for Login) is a simple identity layer, which is built on top of the OAuth 2.0 protocol. It allows applications to verify the identity of a user by federating the authentication of the users to the OAuth Server.
In order to get information regarding a user’s identity, first, an access token is needed. The access token should be issued with scope of “openid”. Once we have the appropriate access token a request to the UserInfo endpoint can be made with the access token passed in the HTTP header. Here is the Google’s UserInfo Endpoint: https://www.googleapis.com/oauth2/v3/userinfo.
In response to this request, JSON response which contains information for the users is sent back.
The two examples in the previous section are showing the flow for Implicit and Code flows for getting user’s information using the OpenID Connect. After getting the user’s account data in the identity server, the user can be authenticated.
When using the OpenID Connect one more token is received by the server. This is the ID Token. This is a separate token from the access token, which is used to retrieve the user’s profile information or other user data requested during the same authorization flow.
The ID token is a JSON Web Token (JWT), which is a digitally signed and/or encrypted representation of the user’s identity asserted by the identity provider. Instead of using cryptographic operations to validate the JSON Web Token, it can be treated as an opaque string and passed to the Check ID Endpoint for interpretation.